Printed Design Sugar Cookies

I don't know what it is in me that I love a doing the least and finding a shortcut. I love to do minimal work with maximum results. I have spent many hours decorating cookies, I'm talking probably hundreds of hours, and I love it. However, I don't really love dealing with piping tips and as many piping bags as colors of icing and then the clean-up. My feelings led me to find my passion in buttercream painting because I only had to bag up a handful of colors; I could mix colors as I went, and it just felt more manageable - no hand cramps. Then I had this idea come to me to make designs on my cookie dough before I cut it, and then after it was done baking, I didn't have to do anything, and it would be beautiful. Another shortcut? I will happily take it.
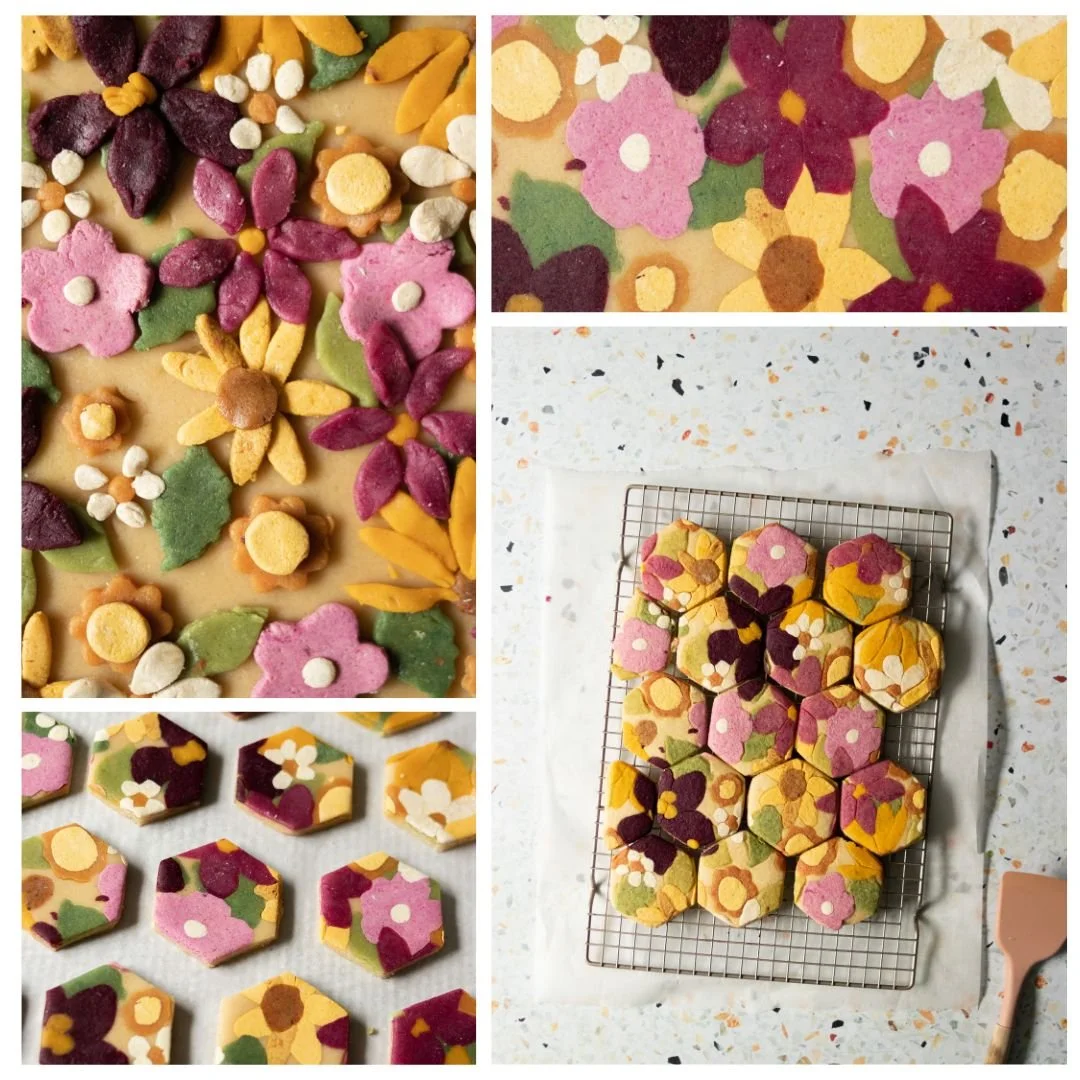
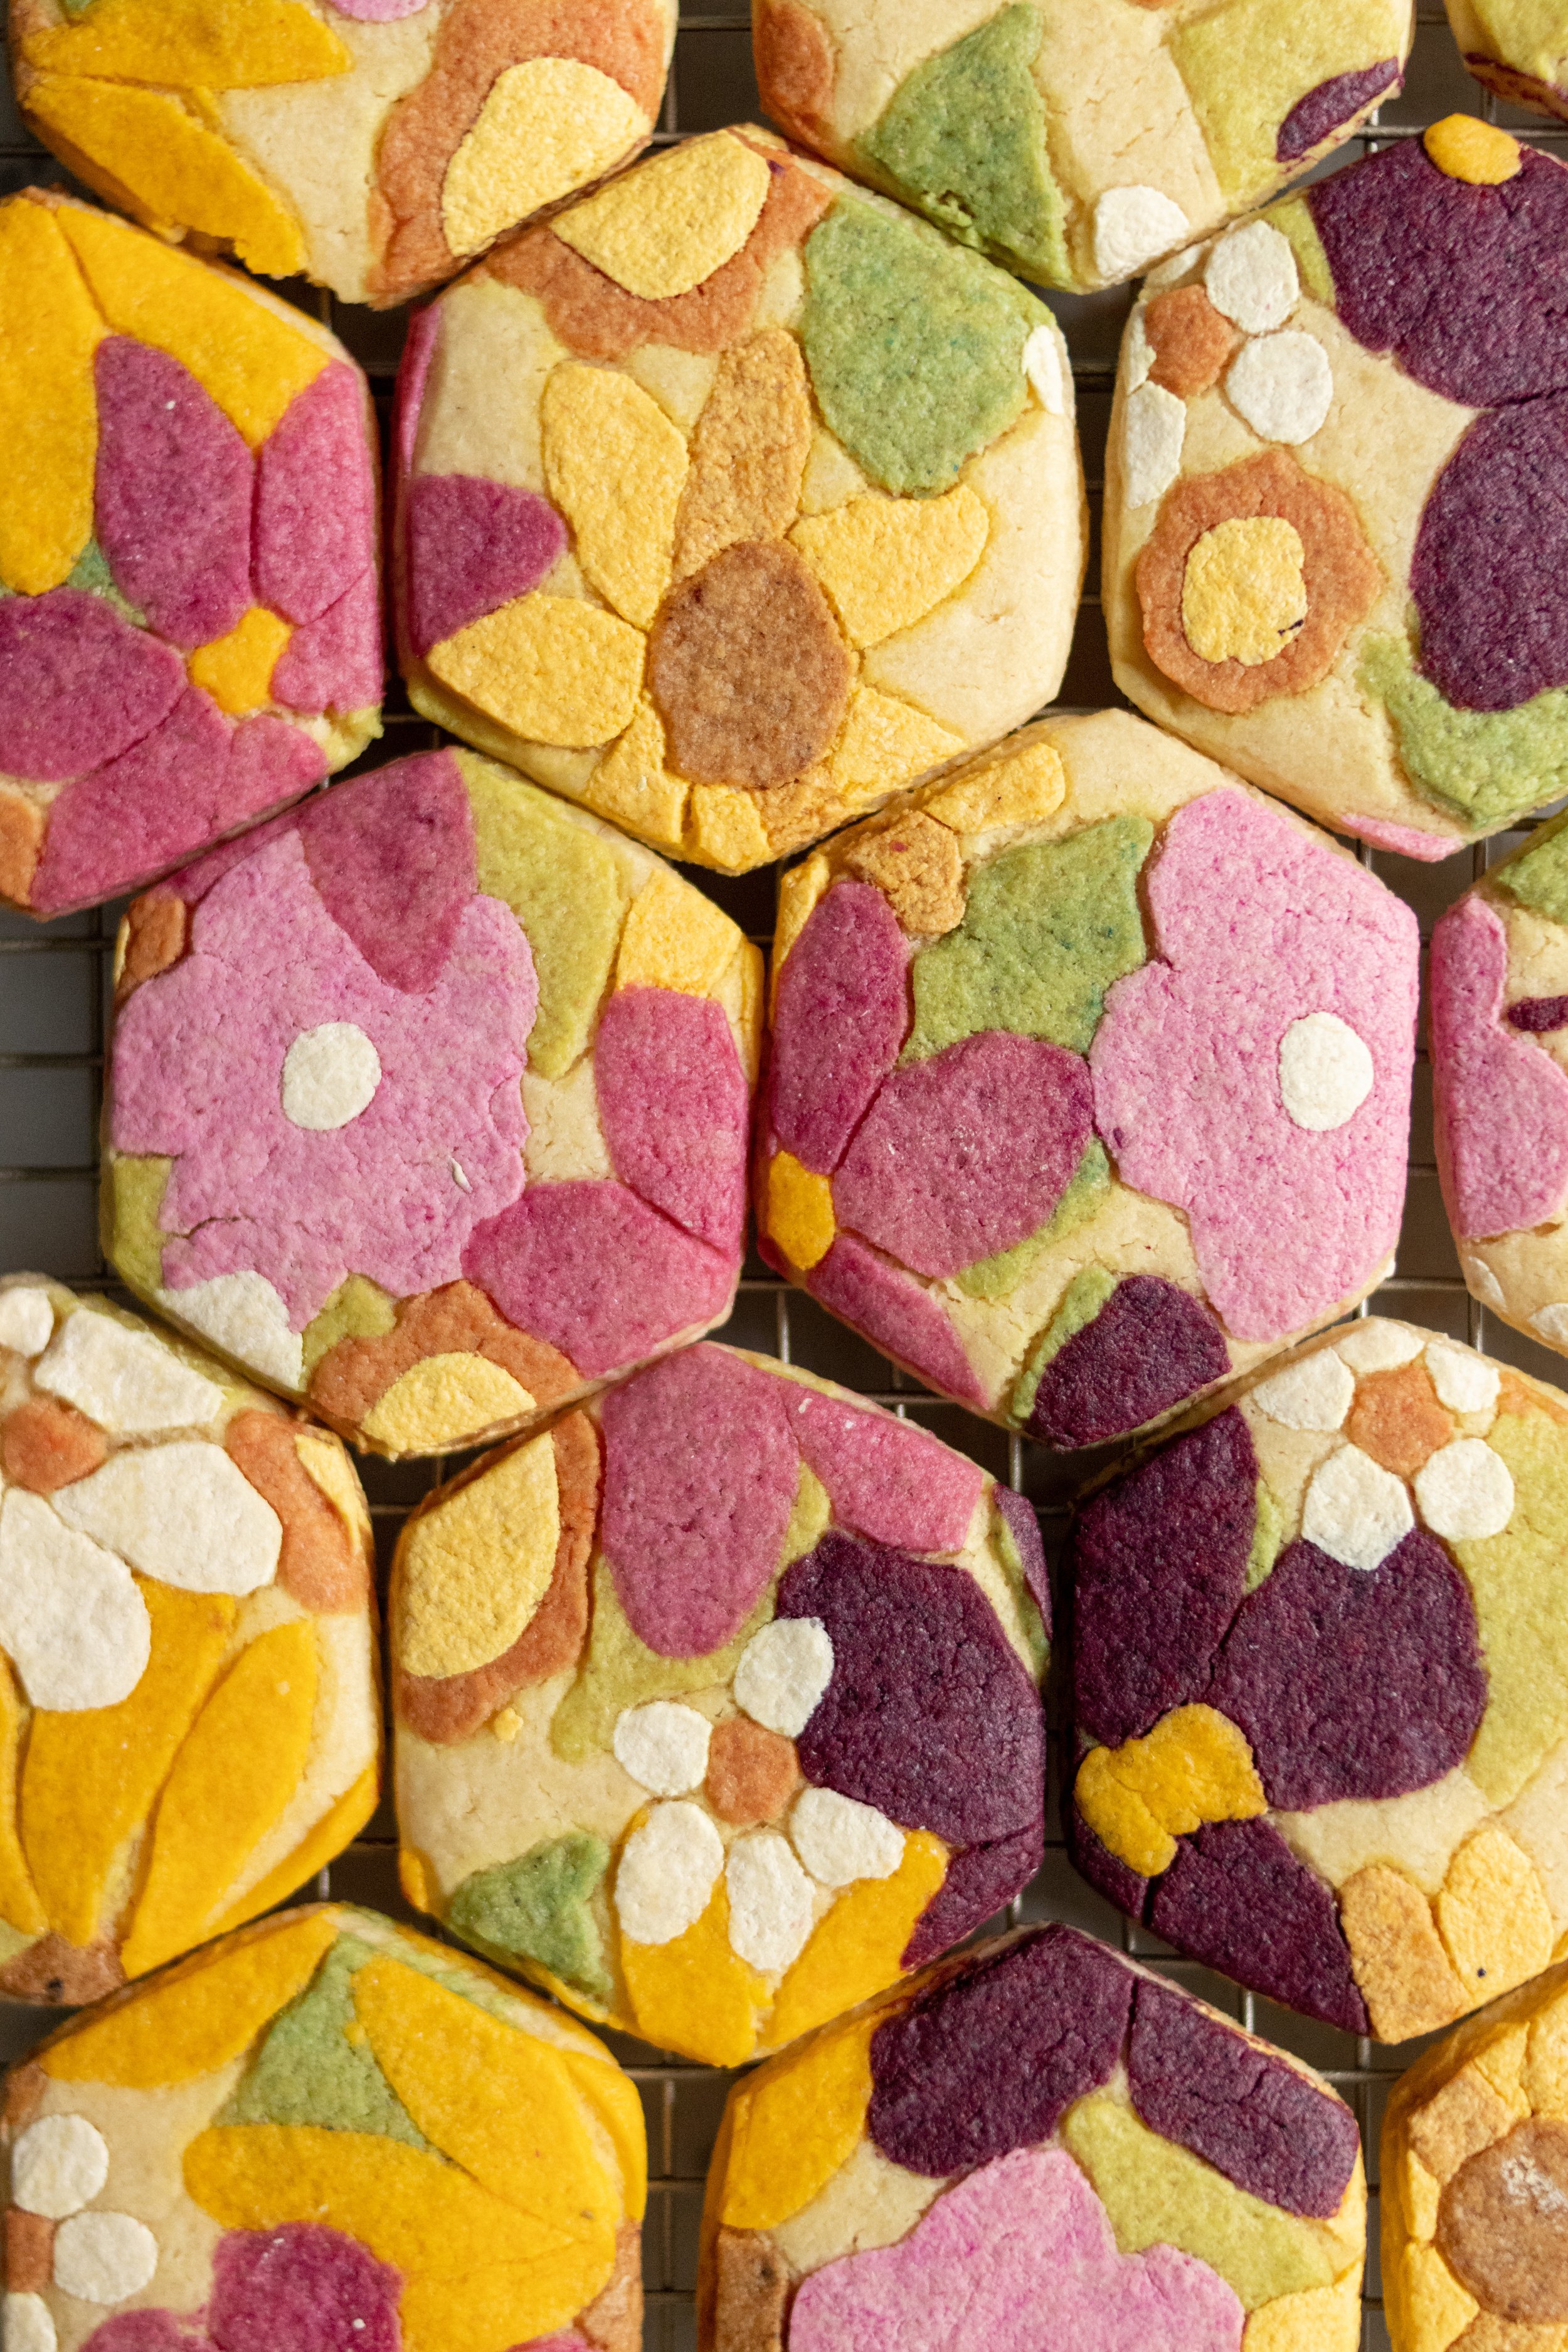
I will be honest, this flower design took me about 30 minutes to cut all the leaves and petals and place on the dough, but when I say that, I literally spent 5 hours decorating 5 (beautiful) sugar cookies with royal icing, the last Christmas, I will take that 30 minutes.
If you decide to make these cookies, I have two pieces of advice. First, make the shapes smaller than you think, and be creative!!! I went a little over the top with the flowers on this cookie, and just doing one flower, with or without leaves, would have been great.
GO-TO SUGAR COOKIES (NO CHILLING REQUIRED)
Makes about 2 dozen, depending on the size of the cookie cutter
INGREDIENTS
1 cup butter
¾ cup white sugar
½ cup brown sugar
2 ½ tsp vanilla
1 tsp almond extract
1 large egg
3 ½ cups flour
2 tsp baking powder
¾ tsp salt
½ tsp cream of tartar
DIRECTIONS
1. Preheat your oven to 350°F
2. In the bowl of your mixer or large mixing bowl, cream butter and sugars until light and fluffy. Beat in the egg, vanilla, and almond extract until just combined. Now add baking powder, salt, and cream of tartar, and mix for 2 minutes
3. Add flour, mix until just combined enough that no flour streaks are left.
4. Roll the dough till about ¼ inch thick and cut into desired shapes with cookie cutters. Place about 3/4 inch apart on the baking sheet. Bake for 7-9 minutes. Cool on the cookie sheet for at least 5 minutes before moving to a cooling rack.

Making Printed Cookies:
Make your cookie dough.
Divide the dough, take about ⅓ -¼ of it, and set it aside.
Roll the remaining dough (⅔ - ¾ of the dough) into a rectangle on a sheet of parchment. Make sure it is about half an inch thick. This is going to be your canvas. Set aside.
Dye the remaining dough into the colors you will need for your design. I like to place pieces of dough by the coloring, so I make sure I have enough, giving me a visual of the color combination. YOu don't need to dye large portions of the dough because you will roll this dough out smaller, and it won't need to cover the entire cookie canvas. If you are using liquid dye, it is a good idea to have a bit of flour on hand to sprinkle on if your dough gets too sticky. I find this dough is great at taking on a little extra moisture.
Once the dough is dyed, it is time to start cutting out the shapes you will need for your design. Roll out the colored dough to about ¼ of an inch thick. I like to make all the shapes I will be using before I start placing them on my cookie canvas. Try to be creative with this. For example, just one part of a cookie cutter might be what you need. I used the bunny ears on a cookie cutter to make petal shapes. Make the shapes smaller than you want on your cookie because they will get stretched out once you roll them all together. Mini cookie cutter shapes, fondant cutters, or clay cutters work great for this kind of cookie. However, I did get some polymer clay cutters that aren't technically food safe and was advised to use plastic wrap over what I was cutting to ensure they didn't have direct contact.
When all your shapes are ready, it is time to start building your masterpiece. If you are adding some backdrop to your cookies (like a check pattern), start with that. Then I like to do my leaves if there are any. I do all the same shapes at once and distribute them evenly on the cookie canvas. I like the look of them not all being perfect but do what suits you.
You have to lay the cutout dough on top and don't need to press it in at all, and this helps move things around until you like the design.
Cover your design with another clean piece of parchment. Using a rolling pin, roll the dough until it reaches your desired thickness. Make sure you roll the dough in all directions to spread your design evenly.
Using a bigger cookie cutter, cut out your cookies, place them on a baking sheet and bake for 7-9 minutes, letting them cool on the baking sheet for 5 minutes before transferring to a cooling rack.
Please take all the scraps of dough left over and roll them together, and cut them out as well. They make a fun cookie on their own, and nothing goes to waste.
If you want to make sandwich cookies, fill cooled cookies with your favorite buttercream and enjoy!
Supplies I use and love:
I am passionate about using natural dyes when possible, and I am a big fan of Color Garden Dyes, but I used Tru Color dyes on these cookies.
These Fat Daddio Hexagon Cookie Cutters are my absolute favorite. They are sturdy, and you can cut them out right next to each other, which is very satisfying.
This white food coloring is used all the time.
The links in this post may be affiliate links.

PRINTED DESIGN SUGAR COOKIES
Ingredients
- 1 cup butter
- ¾ cup white sugar
- ½ cup brown sugar
- 2 ½ tsp vanilla
- 1 tsp almond extract
- 1 large egg
- 3 ½ cups flour
- 2 tsp baking powder
- ¾ tsp salt
- ½ tsp cream of tartar
Instructions
- Preheat your oven to 350°F
- In the bowl of your mixer or large mixing bowl, cream butter and sugars until light and fluffy. Beat in the egg, vanilla, and almond extract until just combined. Now add baking powder, salt, and cream of tartar, and mix for 2 minutes
- Add flour, mix until just combined enough that no flour streaks are left.
- Roll the dough till about ¼ inch thick and cut into desired shapes with cookie cutters. Place about 3/4 inch apart on the baking sheet. Bake for 7-9 minutes. Cool on the cookie sheet for at least 5 minutes before moving to a cooling rack.
- Make your cookie dough.
- Divide the dough, take about ⅓ -¼ of it, and set it aside.
- Roll the remaining dough (⅔ - ¾ of the dough) into a rectangle on a sheet of parchment. Make sure it is about half an inch thick. This is going to be your canvas. Set aside.
- Dye the remaining dough into the colors you will need for your design. I like to place pieces of dough by the coloring, so I make sure I have enough, giving me a visual of the color combination. YOu don't need to dye large portions of the dough because you will roll this dough out smaller, and it won't need to cover the entire cookie canvas. If you are using liquid dye, it is a good idea to have a bit of flour on hand to sprinkle on if your dough gets too sticky. I find this dough is great at taking on a little extra moisture.
- Once the dough is dyed, it is time to start cutting out the shapes you will need for your design. Roll out the colored dough to about ¼ of an inch thick. I like to make all the shapes I will be using before I start placing them on my cookie canvas. Try to be creative with this. For example, just one part of a cookie cutter might be what you need. I used the bunny ears on a cookie cutter to make petal shapes. Make the shapes smaller than you want on your cookie because they will get stretched out once you roll them all together. Mini cookie cutter shapes, fondant cutters, or clay cutters work great for this kind of cookie. However, I did get some polymer clay cutters that aren't technically food safe and was advised to use plastic wrap over what I was cutting to ensure they didn't have direct contact.
- When all your shapes are ready, it is time to start building your masterpiece. If you are adding some backdrop to your cookies (like a check pattern), start with that. Then I like to do my leaves if there are any. I do all the same shapes at once and distribute them evenly on the cookie canvas. I like the look of them not all being perfect but do what suits you.
- You have to lay the cutout dough on top and don't need to press it in at all, and this helps move things around until you like the design.
- Cover your design with another clean piece of parchment. Using a rolling pin, roll the dough until it reaches your desired thickness. Make sure you roll the dough in all directions to spread your design evenly.
- Using a bigger cookie cutter, cut out your cookies, place them on a baking sheet and bake for 7-9 minutes, letting them cool on the baking sheet for 5 minutes before transferring to a cooling rack.
- Please take all the scraps of dough left over and roll them together, and cut them out as well. They make a fun cookie on their own, and nothing goes to waste.
- If you want to make sandwich cookies, fill cooled cookies with your favorite buttercream and enjoy!
Notes
If you decide to make these cookies, I have two pieces of advice. First, make the shapes smaller than you think, and be creative!!! I went a little over the top with the flowers on this cookie, and just doing one flower, with or without leaves, would have been great.